


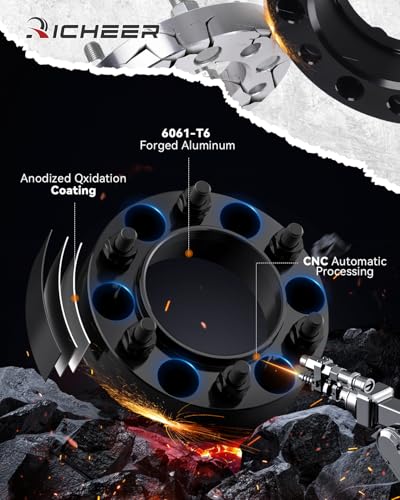


Bora 1.5″ Hub Centric Wheel Spacers – Precision-Machined Aluminum
Our 1.5-inch hub centric wheel spacers are engineered for enthusiasts who demand precision fitment and aggressive wheel positioning. Each spacer is CNC-machined from aerospace-grade 6061-T6 aluminum billet to ensure perfect concentricity with your hub and wheel.
The hub centric design eliminates vibration by transferring vehicle weight through the machined center pilot hole rather than relying solely on wheel studs. We include high-tensile strength grade 10.9 studs that are pressed and thread-locked into each spacer for permanent installation.
Whether you’re clearing larger brake calipers, accommodating aftermarket suspension components, or achieving the exact flush stance you’ve been planning, our 1.5″ spacers deliver repeatable results. We manufacture every set in-house to maintain strict tolerances within 0.001 inches.
- 1.5-inch (38mm) thickness for aggressive stance and clearance
- CNC-machined from 6061-T6 aluminum billet for strength-to-weight ratio
- Hub centric design eliminates wheel vibration and improves handling
- Pre-installed grade 10.9 wheel studs with red thread-locker
- Anodized finish resists corrosion in all weather conditions
Hub Centric Engineering & Precision Tolerances
The hub centric design is what separates our 1.5″ spacers from basic lug-centric alternatives. We machine the center pilot hole to match your vehicle’s factory hub diameter within thousandths of an inch. This precision bore creates metal-to-metal contact between the hub, spacer, and wheel — the same load-bearing principle your vehicle manufacturer designed.
Every spacer undergoes multi-axis CNC machining to maintain concentricity across both hub-facing and wheel-facing surfaces. The stud holes are drilled and tapped using computer-controlled processes that ensure perfect bolt circle alignment. This eliminates the runout and vibration common with cast or poorly machined spacers.
Material Selection & Structural Integrity
We exclusively use 6061-T6 aluminum billet as our source material. This aerospace-grade alloy provides exceptional tensile strength while maintaining a favorable strength-to-weight ratio for unsprung components. The T6 heat treatment process enhances the material’s structural properties and dimensional stability under thermal cycling.
Each spacer begins as solid billet stock rather than cast material. Billet construction eliminates the porosity and internal voids that compromise cast aluminum components. The continuous grain structure throughout the spacer body resists crack propagation and fatigue failure.
Installation Requirements & Torque Specifications
Vehicle Compatibility Check
Before installation, verify your vehicle’s hub diameter and bolt pattern match the spacer specifications. Measure your current wheel offset and calculate the new effective offset after adding 1.5 inches of spacing. Confirm that your wheels have sufficient depth to accommodate the spacer thickness plus remaining stud engagement.
Proper Installation Sequence
Clean both hub surfaces and wheel mounting surfaces with brake cleaner to remove any rust, dirt, or debris. Install the spacer onto the hub and tighten the factory studs to manufacturer specifications in a star pattern. Mount your wheel onto the spacer’s extended studs and torque the lug nuts to factory specifications.
Complete Your Wheel Spacer Setup


What people are saying


Common Questions About 1.5″ Hub Centric Spacers
Measure the clearance gap between your current wheel and the component you need to clear — whether that’s brake calipers, suspension arms, or fender lips. The 1.5″ thickness works well for most aftermarket brake upgrades and moderate stance adjustments.
For lifted trucks with wider tires, this spacing typically provides enough clearance during full suspension articulation. We recommend test-fitting with temporary spacers or measuring carefully before purchasing. Our fitment specialists can help you calculate the exact spacing needed based on your wheel offset and tire size.
Our hub centric design eliminates vibration by transferring vehicle weight through the precision-machined center bore rather than the wheel studs. The spacer fits concentrically onto your hub just like your factory wheel, maintaining perfect alignment.
Handling characteristics remain neutral when spacers are properly installed and torqued. The 1.5″ spacing does slightly increase your vehicle’s track width, which can actually improve stability during cornering. You may notice a minor change in steering feel due to altered scrub radius, but most drivers adapt within a few miles.
Every set of our 1.5″ hub centric spacers includes pre-installed wheel studs. We press grade 10.9 high-tensile strength studs into each spacer and secure them with red thread-locker during manufacturing.
The studs are sized to provide proper thread engagement with your lug nuts after accounting for the spacer thickness. You’ll use your vehicle’s factory lug nuts to secure the wheels to the spacer studs. No additional hardware purchases are required for standard installations.
Re-torque all fasteners after the first 50-100 miles of driving to account for initial settling. Check torque again at 500 miles, then monthly for the first six months.
After the break-in period, verify torque every 5,000 miles during regular tire rotations. Always check torque before long trips or after driving in extreme conditions. We include specific torque values for both the spacer-to-hub studs and the wheel-to-spacer lug nuts in our installation documentation.
We manufacture vehicle-specific versions with the correct center bore diameter and bolt pattern for each application. Common fitments include Ford F-150, Chevy Silverado, Toyota Tacoma, Jeep Wrangler, and Ram 1500 models.
Enter your year, make, and model during checkout to receive spacers machined for your exact hub specifications. We verify bolt pattern (4×100, 5×114.3, 6×139.7, etc.) and hub bore diameter before shipping. Contact our fitment team if you’re unsure about compatibility with aftermarket wheels.
Installation requires basic hand tools and a torque wrench but no specialized equipment. If you’re comfortable rotating your own tires, you can install these spacers following our step-by-step instructions.
The process involves cleaning the hub surfaces, mounting the spacer, torquing the factory studs, then mounting your wheel onto the spacer’s extended studs. Most DIY installers complete a four-wheel installation in 60-90 minutes. Professional installation is available at most tire shops if you prefer.
Adding 1.5″ spacers effectively reduces your wheel offset by 38mm, pushing the wheel outward from the vehicle centerline. If you currently run wheels with +20mm offset, the final effective offset becomes -18mm after spacer installation.
This creates a more aggressive stance with wheels sitting closer to flush with your fenders. Calculate your new track width by adding 3 inches total (1.5″ per side). Use our online calculator to visualize how different spacer thicknesses affect your specific wheel and tire combination before ordering.